Introduction
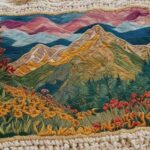
Embroidered scenery, with its intricate stitches and captivating imagery, offers a unique opportunity for creative expression. Combining the artistry with the beauty of nature and landscapes (like Bob Ross did with paintings), scenery embroidering allows artisans to evoke the tranquility of a mountain vista, the serenity of a forest glade, or the charm of a rustic countryside with each meticulously placed stitch.
In this comprehensive guide, we’ll delve into the techniques, tips, and tricks needed to master scenery embroidering and bring stitched landscapes to life. From understanding the fundamentals of this art form to selecting materials, creating designs, and executing stitches, this guide will equip you with the skills and confidence to embark on your embroidery journey.
Whether you’re a novice looking to explore a new craft or an experienced embroiderer seeking to expand your repertoire, the possibilities for creativity and expression in scenery embroidering are as vast and varied as the landscapes that inspire them. So gather your materials, unleash your creativity, and let’s dive into the enchanting world of scenery embroidering together.
Understanding Scenery Embroidering
Scenery embroidering is an art form that goes beyond mere stitching; it involves encapsulating the essence of a landscape onto fabric, using needle and thread as the medium of expression. Each stitch, meticulously placed, serves as a brushstroke, capturing the beauty and intricacies of nature. Whether you’re recreating a serene countryside, a bustling cityscape, or an otherworldly fantasy realm, scenery embroidering allows you to bring your imagination to life in vibrant detail.
To truly understand scenery embroidering, one must appreciate its fusion of technique and creativity. It’s not just about replicating what you see; it’s about infusing your embroidery with emotion, depth, and texture. Through careful selection of stitches, colors, and shading techniques, you can evoke the mood and atmosphere of a landscape, transporting viewers to distant vistas and hidden realms.
One of the key aspects of understanding scenery embroidering is grasping the importance of composition. Like a painter composing a canvas, an embroiderer must consider the arrangement of elements within the design. From the placement of trees and mountains to the flow of rivers and valleys, every aspect of the composition contributes to the overall impact of the embroidered scene. By mastering the art of composition, you can create landscapes that not only look visually appealing but also tell a story and evoke an emotional response.
Another crucial aspect of scenery embroidering is attention to detail. It’s the small nuances—the dappling of sunlight on leaves, the reflection of clouds in water, the texture of rocky terrain—that breathe life into your embroidery. By focusing on these details and using techniques such as shading, layering, and texture stitches, you can add depth and dimension to your stitched landscapes, making them feel alive and immersive.
Ultimately, understanding scenery embroidering is about tapping into your imagination and allowing yourself to be inspired by the world around you. Whether you draw inspiration from real life landscapes, photographs, or your own imagination, the possibilities for creativity in scenery embroidering are limitless. It’s a journey of exploration and discovery, where each stitch brings you closer to unlocking the beauty and magic of the natural world. So embrace the challenge, unleash your creativity, and let your embroidered landscapes transport you to realms of wonder and enchantment.

Choosing Materials and Tools
When delving into the world of scenery embroidery, selecting the right materials and tools is paramount to the success of your project. Here’s a comprehensive guide to help you make informed choices:
Embarking on a scenery embroidery project requires careful consideration of various factors, from the intricacies of your design to the capabilities of your embroidery machine. By taking the time to research and choose the appropriate materials and tools, you can ensure that your scenery embroidery journey is smooth and successful. Whether you’re a seasoned embroiderer or a novice exploring this creative craft, investing in high quality materials and tools will not only enhance the quality of your work but also streamline your workflow and allow you to unleash your creativity to its fullest potential.
• Embroidery Machine: When selecting an embroidery machine, consider factors such as the size of the hoop, the variety of built in stitches, and the ease of use. Look for machines with features like automatic thread tension adjustment, built in embroidery designs, and USB connectivity for importing custom designs. Investing in a reliable embroidery machine that meets your specific needs and preferences will ensure smooth and hassle free stitching.
• Hoops and Frames: Hoops and frames are essential accessories for securing your fabric during the embroidery process. Choose hoops and frames that are compatible with your embroidery machine and come in various sizes to accommodate different project dimensions. Look for features like easy grip handles and adjustable tension to ensure a snug fit and prevent fabric shifting during stitching.
• Embroidery Threads: Selecting the right embroidery threads is crucial for achieving vibrant and long lasting scenery embroidering designs. Consider using high quality polyester or rayon threads known for their durability, colorfastness, and sheen. Choose thread colors that complement your design and fabric, and invest in a variety of shades to add depth and dimension to your embroidered artwork.
• Stabilizers: Stabilizers provide essential support and stability to your fabric during the embroidery process, preventing puckering, stretching, and distortion. Choose stabilizers that match your fabric weight and embroidery design complexity. Tear away stabilizers are ideal for lightweight fabrics and simple designs, while cut away stabilizers offer more stability for heavyweight fabrics and intricate designs.
• Fabric: The choice of fabric plays a significant role in the outcome of your scenery embroidering project. Select fabrics that are compatible with machine embroidery and suitable for your desired application. Cotton, linen, twill, and canvas are popular choices for their stability, durability, and ease of stitching. Prewash your fabric to remove any sizing or residues that could affect the scenery embroidering process and ensure optimal results.

• Needles: Using the correct needles is essential for achieving precise and professional embroidery results. Choose machine embroidery needles specifically designed for use with your embroidery machine and compatible with your fabric and thread choices. Select the appropriate needle size based on your fabric weight and thickness, ensuring smooth and accurate stitching with minimal thread breakage.
• Design Software: Design software allows you to create, edit, and digitize embroidery designs with ease and precision. Choose design software that is compatible with your embroidery machine and offers features such as resizing, rotating, and editing designs. Invest in training or tutorials to master the use of design software and unleash your creativity in designing custom embroidery patterns and motifs. We have covered digitizing software in a previous article, which can be viewed here.
By carefully selecting materials and tools tailored to your specific embroidery needs, you’ll set yourself up for success and create stunning machine embroidered masterpieces with ease and confidence.
Creating an Embroidery Design
Creating a design is a crucial step in the machine embroidery process, as it sets the foundation for the entire project. Here’s a detailed guide to help you unleash your creativity and craft stunning embroidery designs:
1. Conceptualization: Begin by brainstorming ideas and concepts for your embroidery design. Consider the theme, style, and purpose of your project, as well as any specific imagery or motifs you want to incorporate. Take inspiration from nature, art, literature, or your own imagination to develop unique and compelling design concepts.
2. Sketching: Once you have a concept in mind, sketch out rough outlines and compositions for your embroidery design. Use pencil and paper or digital drawing tools to explore different layouts, shapes, and proportions. Focus on capturing the essence of your design elements, such as landscapes, animals, flowers, or geometric patterns, in simple and clear line drawings.
3. Reference Materials: Gather reference materials such as photographs, illustrations, or existing embroidery designs to inform and inspire your design process. Study the details, textures, and colors of your reference materials to ensure accuracy and realism in your embroidery design. Use these references as a guide to refine and enhance your initial sketches.

4. Digitization: If you’re creating a custom design from scratch, consider digitizing your design using embroidery design software. Digitization involves converting your hand drawn or digital artwork into a format that can be read and stitched by an embroidery machine. Use the software’s tools and features to trace and digitize your design, adjusting stitch settings, densities, and colors as needed.
5. Composition: Pay attention to the composition of your embroidery design, ensuring a balanced and visually appealing layout. Consider the placement and scale of design elements within the embroidery hoop, leaving enough space for borders, text, or additional embellishments. Experiment with different arrangements and alignments until you achieve a composition that feels cohesive and harmonious.
6. Color Selection: Choose a color palette that complements your design concept and enhances its visual impact. Consider factors such as contrast, harmony, and mood when selecting colors for your embroidery design. Use color theory principles to create depth, dimension, and visual interest in your stitched artwork. Experiment with different color combinations and shades to find the perfect balance for your design.
7. Detailing: Pay attention to the details of your embroidery design, adding texture, shading, and embellishments to bring it to life. Incorporate intricate stitch patterns, gradient fills, or specialty threads to enhance the realism and depth of your design. Consider using techniques such as appliqué, thread painting, or 3D embroidery to add dimension and tactile appeal to your stitched artwork.
8. Test Stitching: Before stitching your design onto your final fabric, perform test stitches on a scrap piece of fabric to ensure the design stitches out correctly. Check for any digitizing errors, thread breaks, or tension issues that may affect the quality of the embroidery. Make any necessary adjustments to your design or machine settings to achieve optimal stitching results.
By following these steps and incorporating your creativity and artistic vision, you can create stunning embroidery designs that captivate and inspire viewers. Experiment with different techniques, styles, and themes to push the boundaries of machine embroidery and unlock your full creative potential.
Transferring the Design to the Embroidery Machine
Transferring your design from your computer to the embroidery machine is a crucial step in the machine embroidery process. There are several methods available for moving the design files to your embroidery machine:
• USB Flash Drive: One of the most common methods is transferring the design files using a USB flash drive. Save the design file onto the flash drive on your computer, then insert the flash drive into the USB port on your embroidery machine. Navigate through the machine’s menu to locate the design files on the flash drive and select the desired design for stitching.

• Memory Card: Some embroidery machines are equipped with memory card slots that allow you to transfer design files using a memory card. Save the design file onto a compatible memory card on your computer, then insert the memory card into the designated slot on your embroidery machine. Access the design files through the machine’s menu and load the desired design for stitching.
• Direct Connection: If your embroidery machine is equipped with connectivity options such as USB or WiFi, you may be able to transfer design files directly from your computer to the machine. Connect your computer to the embroidery machine using the provided cable or wireless network, then use embroidery software or machine specific software to transfer the design files directly to the machine’s internal memory.
• Ethernet Connection: Some advanced embroidery machines support Ethernet connectivity, allowing you to transfer design files over a local network. Connect your embroidery machine to your computer or network router using an Ethernet cable, then use embroidery software or network sharing features to transfer the design files to the machine’s internal memory or storage.
• Embroidery Design Cards: In some cases, older embroidery machines may require the use of proprietary embroidery design cards, cartridges or SD cards to transfer design files. Save the design files onto the appropriate card format compatible with your machine, then insert the card into the designated slot on the machine to access the designs for stitching.
Regardless of the method you choose, ensure that the design files are saved in a compatible format supported by your embroidery machine (such as .pes, .dst, .exp, .jef, .hus, etc.). Follow the manufacturer’s instructions for your specific machine model to transfer the design files successfully and prepare for stitching. Once the design files are transferred, you can proceed to select and stitch the desired design onto your fabric with ease and precision.
Embroidering Your Scenery
Embroidering your scenery is the culmination of all your preparation and planning, where your vision begins to take shape stitch by stitch. This phase of the process is where your creativity truly shines, as you bring the beauty of your chosen landscape to life with every meticulously placed thread. Here’s a detailed guide on how to complete your scenery embroidering project with precision and artistry:
1. Prepare Your Workspace: Before you begin embroidering, ensure that your workspace is clean, well lit, and free from distractions. Set up your embroidery machine with the appropriate hoop size and thread colors for your design. Double check that your fabric is securely hooped and positioned correctly to prevent any shifting during stitching.
2. Thread the Machine: Load your embroidery machine with the first color of thread required for your design. Thread the machine following the manufacturer’s instructions, making sure the thread is properly seated in the tension disks and threading path. Use a matching bobbin thread to ensure seamless stitching on both sides of the fabric.

3. Start Stitching: With your design loaded and the machine properly threaded, it’s time to start stitching. Begin the embroidery process, following the prompts on the machine’s display screen or control panel. Watch as the machine comes to life, moving with precision and speed as it executes each stitch according to the digital design.
4. Monitor Progress: As the machine works on completing your scenery embroidering, keep a close eye on the stitching progress. Watch for any thread breaks, tension issues, or fabric puckering that may occur during stitching. Make any necessary adjustments to the machine settings or thread tension to ensure smooth and consistent stitching throughout the design.
5. Change Thread Colors: As your design progresses, the machine will prompt you to change thread colors as needed. Pause the machine at the designated color change points and carefully trim the excess thread tails. Replace the current thread with the next color in your design sequence, ensuring that the thread is properly threaded and tensioned before resuming stitching.
6. Embrace Creativity: While the machine does the bulk of the stitching work, don’t be afraid to inject your own creativity and artistry into the process. Experiment with different stitch densities, thread types, and embellishments to add texture, dimension, and visual interest to your embroidered scenery. Consider incorporating specialty threads, metallic accents, or appliqué elements to enhance the realism and impact of your design.
7. Take Breaks: Embroidering can be a time consuming process, so be sure to take regular breaks to rest your eyes and stretch your muscles. Use this time to step back and assess your work from a distance, ensuring that the composition, colors, and details of your scenery are coming together as intended.
8. Finalization: Once the embroidery is complete, remove the fabric from the hoop and trim any excess threads. If desired, gently press the embroidered fabric on the wrong side using a pressing cloth to remove any wrinkles or creases. Admire your finished scenery embroidering masterpiece and celebrate the culmination of your creativity and craftsmanship.
Finishing Touches
After completing the embroidery process, it’s time to add the final touches to your masterpiece to ensure it’s ready for display or use. Here’s how to put the finishing touches on your embroidered scenery:
Firstly, carefully remove the fabric from the embroidery hoop, taking care not to distort or damage the stitches. Gently press the embroidered fabric on the wrong side using a pressing cloth and a low heat setting on your iron. This helps to smooth out any wrinkles or creases caused by the stitching process and gives your embroidery a polished finish.
Next, trim any excess threads from the front and back of the embroidered fabric using sharp embroidery scissors. Pay close attention to detail, ensuring that all thread tails are neatly trimmed and hidden within the stitching to create a clean and professional looking finish.

If desired, you can further enhance your scenery embroidering project with additional embellishments or decorative elements as desired. Consider adding beads, sequins, or rhinestones to highlight specific areas of the design or create a sparkling effect. Alternatively, incorporate appliqué pieces or fabric patches to add texture and dimension to your embroidery. You could even place it in a frame.
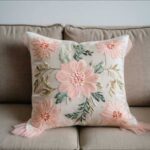
Once you’re satisfied with the final appearance of your embroidered scenery, consider how you’d like to display or use it. You may choose to frame the embroidery in a decorative frame or mount it on a stretched canvas for wall art. Alternatively, incorporate the embroidered fabric into a quilt, pillow, or garment to showcase your handiwork in everyday life.
Finally, don’t forget to sign and date your embroidered scenery to mark it as a unique and personal creation. Embroider your initials, signature, or a special message onto the fabric using a contrasting thread color and a simple backstitch or satin stitch. This personal touch adds a meaningful and memorable detail to your embroidery and ensures that your artistic legacy lives on for generations to come.
By taking the time to add these finishing touches, you can elevate your embroidered scenery from a mere stitching project to a true work of art that reflects your creativity, skill, and passion for embroidery.
Conclusion
In conclusion, mastering scenery embroidering is a rewarding journey that allows you to unleash your creativity and bring landscapes to life with needle and thread. Through careful planning, preparation, and execution, you can create stunning stitched landscapes that captivate and inspire viewers.
However, it’s important to remember that the step-by-step method outlined in this guide is just one approach to scenery embroidering. There may be other methods, techniques, and creative processes that you can explore and adapt to suit your unique style and preferences. Don’t be afraid to experiment, innovate, and discover new ways to express yourself through embroidery.
Whether you’re a novice embroiderer or a seasoned stitcher, the key to success lies in patience, practice, and a willingness to learn and grow. Embrace the journey, cherish the process, and let your embroidered landscapes be a testament to your passion and dedication to the art of embroidery.
So, as you embark on your scenery embroidering adventures, remember to enjoy the creative process, celebrate your achievements, and continue to push the boundaries of your craft. With each stitch, you’re not just creating art; you’re creating memories, stories, and connections that will last a lifetime.
Now that you have read through this article, feel free to SHOP for products we have created. If you are looking for something special which isn’t in our store, feel free to contact us.