Introduction
Embroidery is a timeless craft that combines artistic expression with technical precision. Central to achieving exquisite embroidery results is mastering the intricacies of tension settings. Whether you’re a seasoned embroiderer or just beginning your journey, understanding how tension influences stitch quality is essential. This article explores in depth the pivotal role of tension settings in embroidery, from the fundamentals of adjusting upper and lower tensions to troubleshooting common issues that can impact the final outcome of your projects.
Embroidery enthusiasts often encounter challenges such as thread breakage, puckering, or uneven stitch tension. These issues can arise from factors like improper tension settings, inadequate fabric stabilization, or using the wrong needle for the fabric type. By gaining a comprehensive understanding of tension adjustments and employing effective troubleshooting techniques, embroiderers can navigate these challenges with confidence. This article aims to equip you with practical insights and strategies to achieve balanced tension settings, ensuring that every stitch you create is a testament to your skill and dedication.
Throughout this exploration, we’ll delve into techniques for adjusting tension settings, the importance of regular machine maintenance, and the value of seeking advice from experienced embroiderers and machine manuals. By harnessing the power of tension control, you can elevate your embroidery craftsmanship and unleash your creativity to produce stunning, professional quality designs.
Understanding Tension Settings in Embroidery
Embroidery machines rely on tension settings to regulate the tightness of the thread as it passes through the machine during stitching. This setting is crucial because it determines how much resistance the upper and lower threads exert on each other. Proper tension ensures that the stitches are formed consistently, lie flat on the fabric, and maintain a neat appearance. Tension in an embroidery machine is typically controlled by tension discs, which are responsible for guiding the upper thread and adjusting its tightness. When set correctly, these discs ensure that the upper thread pulls just enough to create secure stitches without causing the fabric to pucker or the thread to break.
Achieving balanced tension means that the upper and lower threads interlock properly within the fabric layers, resulting in smooth and even stitches visible on both sides of the fabric. Imbalanced tension occurs when one thread is tighter than the other, leading to visible loops on either side of the fabric or even thread breakage during stitching. Several factors influence tension settings, including the type and quality of thread used.
Different threads, such as polyester, rayon, and metallic, have varying elasticity and thickness, which affect how they interact with tension settings. Higher quality threads often require less tension adjustment compared to lower quality ones. Additionally, the type and thickness of the fabric play a significant role. Thin, delicate fabrics like silk or organza require lower tension settings to prevent damage, while thicker fabrics such as denim or canvas may need higher tension to ensure stitches penetrate and hold securely.
Machine speed and stitch complexity also impact tension. Faster machine speeds and complex stitch patterns can affect tension, with higher speeds potentially requiring slightly tighter tension to control thread movement, while intricate designs may need adjustments to prevent thread bunching or skipping. Moreover, the way bobbins are wound and placed can disrupt tension settings. Incorrectly wound bobbins or improperly placed bobbins can lead to inconsistent thread tension, so it is essential to ensure bobbins are wound evenly and placed correctly in the bobbin case.
Mastering tension adjustment involves both technical knowledge and practical experience. Embroiderers often perform test runs on scrap fabric before starting a project to fine tune tension settings. This process allows them to observe how the threads interact and make necessary adjustments for optimal results based on the specific project requirements. Proper tension settings not only ensure the aesthetic quality of embroidery but also impact the durability and longevity of the stitched design. By maintaining balanced tension, embroiderers can produce professional grade results that withstand wear and washing without compromising on visual appeal.
Factors Influencing Tension Settings
Several factors influence tension settings in embroidery, each playing a crucial role in ensuring that stitches are properly formed and that the final embroidery project meets quality standards. These factors include thread type and quality, fabric type and thickness, machine speed and stitch complexity, and bobbin winding and placement.
1. Thread Type and Quality
The type of thread used in embroidery significantly affects tension settings. Different threads have varying properties such as elasticity, thickness, and material composition. For example, polyester threads are known for their strength and durability, often requiring slightly different tension settings compared to more delicate rayon threads, which have a softer and shinier appearance.
Metallic threads, which are often more rigid and prone to breakage, demand meticulous tension adjustments to prevent issues during stitching. Additionally, the quality of the thread can impact tension; high quality threads tend to be more consistent in thickness and strength, requiring fewer adjustments, while lower quality threads might necessitate frequent tension recalibration to avoid uneven stitches or thread breakage.
2. Fabric Type and Thickness
The fabric being embroidered on is another critical factor. Lightweight fabrics such as silk, organza, and chiffon are delicate and can easily be distorted by excessive tension. These fabrics require lower tension settings to prevent puckering or tearing. On the other hand, heavier fabrics like denim, canvas, and leather require higher tension settings to ensure that the needle and thread can penetrate the material and create secure stitches. The texture of the fabric also plays a role; for example, stretchy fabrics like jersey or knit may need adjusted tension to accommodate their elasticity and prevent the fabric from stretching out of shape during embroidery.
3. Machine Speed and Stitch Complexity
The speed at which the embroidery machine operates and the complexity of the stitch patterns being used can also affect tension settings. Higher machine speeds increase the movement and friction of the thread, potentially requiring tighter tension to keep the thread under control. Conversely, slower speeds might allow for more relaxed tension settings.
Complex stitch patterns, such as those involving dense fills or intricate details, often require precise tension adjustments to ensure that all elements of the design are executed cleanly without thread bunching or uneven stitching. As the complexity of the design increases, the embroiderer must pay closer attention to how the tension settings interact with the specific requirements of each part of the pattern.
4. Bobbin Winding and Placement
The bobbin, which holds the lower thread in an embroidery machine, must be wound and placed correctly to maintain consistent tension. An unevenly wound bobbin can cause fluctuations in tension, leading to problems such as thread nesting, where loops of thread form underneath the fabric. Proper bobbin winding ensures that the thread is distributed evenly, preventing such issues. Furthermore, the placement of the bobbin in the bobbin case is critical; if the bobbin is not seated correctly, it can disrupt the tension balance between the upper and lower threads. Regularly checking and maintaining the bobbin and bobbin case can help avoid these common tension related problems.
5. Additional Considerations
Beyond the primary factors, there are additional considerations that can influence tension settings. Environmental conditions, such as humidity and temperature, can affect both the thread and the fabric, potentially requiring tension adjustments. The age and condition of the embroidery machine also play a role; older machines or those that haven’t been regularly serviced might have worn parts that affect tension consistency. Additionally, the type of needle used can impact tension, as needles designed for specific fabrics or threads can help achieve better tension control.
Understanding and managing these factors allows embroiderers to achieve the perfect balance in tension settings, ensuring high quality, professional results. By considering the type and quality of thread, fabric characteristics, machine speed and stitch complexity, and bobbin management, embroiderers can make informed adjustments that enhance both the process and the final embroidered product.
Impact on Embroidery Quality
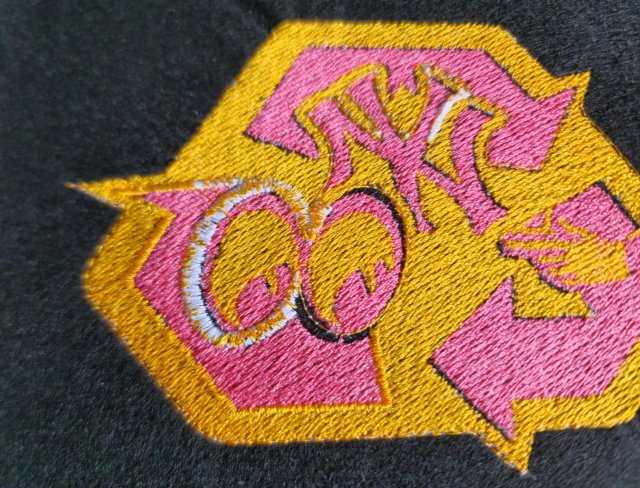
The correct tension setting can transform an embroidery project from mediocre to outstanding, playing a pivotal role in the overall quality of the finished product. Proper tension ensures that stitches are even, smooth, and secure, contributing to the visual appeal and structural integrity of the embroidery. When the tension is perfectly balanced, the upper and lower threads interlock precisely within the fabric, resulting in crisp, clean lines and well defined details that enhance the design’s clarity and sharpness. This balance prevents common issues such as thread loops, puckering, or gaps between stitches, which can detract from the overall appearance of the embroidery.
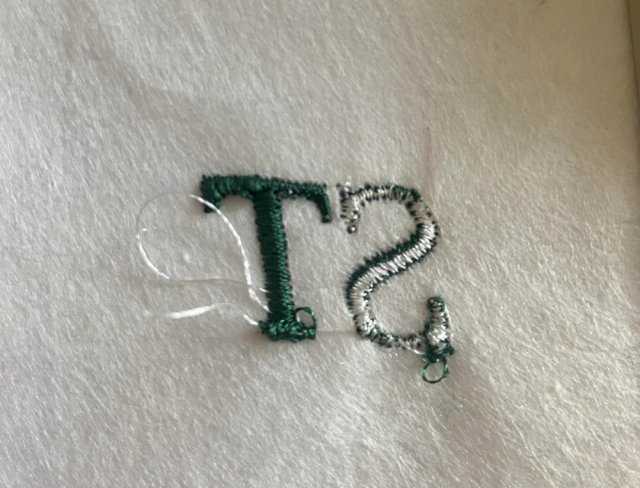
One of the primary impacts of correct tension settings is on the clarity of details in the embroidered design. Intricate patterns, fine lettering, and delicate motifs require precise tension adjustments to ensure that every element is rendered accurately. If the tension is too tight or too loose, it can cause distortion in the design, with details appearing blurred or misaligned. Balanced tension allows for consistent stitch formation, ensuring that even the smallest details are clearly visible and well defined.
Smoothness of outlines is another critical aspect influenced by tension settings. Outlines and borders in embroidery designs need to be sharp and continuous to create a polished and professional look. Incorrect tension can lead to jagged or uneven lines, making the design appear amateurish. Proper tension control ensures that outlines are smooth and uninterrupted, enhancing the overall visual appeal of the embroidery.
The overall durability of the embroidery is also significantly affected by tension settings. Stitches that are too loose can lead to thread unraveling or catching during wear or washing, compromising the longevity of the embroidered item. Conversely, stitches that are too tight can cause the fabric to pucker or distort, reducing the durability and aesthetic quality of the embroidery. Proper tension ensures that stitches are securely anchored in the fabric, providing resilience against wear and tear and maintaining the design’s integrity over time.
Incorrect tension settings can lead to various issues that not only affect the quality of the embroidery but also the embroiderer’s experience. For example, if the tension is too tight, it can cause frequent thread breakage, leading to interruptions in the stitching process and increased frustration for the embroiderer. This can also result in wasted materials and time, as the embroiderer must frequently rethread the machine and restart the design. On the other hand, tension that is too loose can cause thread loops or knots to form on the fabric’s surface or underside, creating an unsightly mess that requires significant effort to correct.
Tension settings play a crucial role in the overall appearance of different stitch types used in embroidery. Satin stitches, for instance, need to lie flat and smooth to create a glossy, high quality finish. Improper tension can cause these stitches to pucker or bunch up, detracting from their intended effect. Similarly, fill stitches require balanced tension to create a uniform, even surface without gaps or inconsistencies. Achieving the right tension is essential for ensuring that all stitch types are executed correctly, contributing to the cohesive and polished look of the final design.

The impact of tension settings extends beyond the technical aspects of stitching to the artistic expression of the embroiderer. By mastering tension control, embroiderers can fully realize their creative visions, producing designs that are not only technically sound but also aesthetically pleasing. Proper tension settings allow for experimentation with different threads, fabrics, and stitch techniques, enabling embroiderers to push the boundaries of their craft and create unique, high quality works of art.
You must remember that the impact of tension settings on embroidery quality is profound and multifaceted. From enhancing design clarity and stitch smoothness to ensuring durability and enabling artistic expression, proper tension control is a cornerstone of successful embroidery. By understanding and mastering tension settings, embroiderers can elevate their work, producing stunning, professional grade embroidery that stands the test of time.
Techniques for Adjusting Tension Settings
Mastering tension settings in embroidery requires a blend of technical knowledge, careful observation, and practical experience. The process involves understanding how to adjust both the upper and lower tension to achieve balanced stitches. Embroiderers must become adept at identifying signs of tension imbalance and applying the right techniques to correct them, ensuring high quality results for each project.
• Understanding Basic Controls and Adjustments
To effectively adjust tension settings, it’s essential to understand the basic controls of your embroidery machine. Most machines feature a tension dial or digital settings for adjusting the upper thread tension. This dial typically ranges from 0 to 9 or has a digital scale, allowing for precise adjustments. Small turns of the dial or incremental changes in digital settings can significantly impact the tension, so it’s crucial to make adjustments gradually and test the results on a scrap piece of fabric before starting your project.
• Adjusting Upper Tension
The upper tension controls how tightly the upper thread is pulled through the fabric. Proper upper tension ensures that the needle thread and bobbin thread interlock smoothly within the fabric layers. When the tension is too tight, the upper thread may pull the lower thread up through the fabric, causing puckering or distortion.
Conversely, if the tension is too loose, the lower thread may show on the upper side of the fabric, resulting in loops or uneven stitches. To adjust the upper tension, start with the machine’s default setting for the specific thread and fabric combination. Make slight adjustments, testing on the same type of fabric you’ll use for your project. Observe how the stitches form: ideally, the threads should interlock just beneath the fabric surface, with no visible pulling or looping on either side.
• Adjusting Lower Tension (Bobbin Tension)
The bobbin tension, controlled by the tension screw on the bobbin case, affects how tightly the lower thread is pulled up into the fabric. Adjusting the bobbin tension is critical for achieving balanced stitches. To adjust, remove the bobbin case from the machine and locate the small tension screw.
Use a small screwdriver to make slight clockwise turns to increase tension or counterclockwise turns to decrease tension. A drop test can help determine if the bobbin tension is correct: hold the bobbin case by the thread tail and let it dangle. The case should descend slowly and steadily. If it drops too quickly, the tension is too loose; if it doesn’t move at all, the tension is too tight. Adjust the tension screw accordingly and re test until the desired balance is achieved.
• Conducting Test Runs
Before starting your embroidery project, conduct test runs on scrap fabric using the same type of thread and fabric you intend to use. Create a test design that includes various types of stitches, such as satin stitches, fill stitches, and decorative stitches. Testing different stitch types allows you to observe how the current tension settings affect the appearance and quality of each stitch. This process helps you identify any tension issues early on and fine tune the settings before beginning your main project.
• Regular Machine Maintenance
Proper maintenance of your embroidery machine is essential for consistent tension settings. Dust, lint, and small thread fragments can accumulate in the tension discs, bobbin case, and other machine components, affecting tension balance. Regularly clean the tension discs with a soft brush or compressed air to remove debris. Follow the manufacturer’s guidelines for oiling and lubricating your machine to ensure smooth operation. By keeping your machine clean and well maintained, you can prevent common tension related problems and maintain optimal stitching quality.
• Seeking Advice and Using Resources
Refer to your embroidery machine’s manual for specific tension settings recommended by the manufacturer for different types of threads and fabrics. The manual often provides troubleshooting tips and guidelines for adjusting tension based on common issues. Additionally, join online forums, embroidery groups, or attend classes where experienced embroiderers share their tips and techniques for achieving optimal tension settings. Learning from others’ experiences can provide valuable insights and help you navigate challenges more effectively.
• Using Specialized Tools
For precise tension measurement, consider using a tension gauge. A tension gauge measures the tension of both upper and lower threads accurately, providing numerical readings that help standardize tension settings across different projects and threads. This tool is particularly beneficial for commercial embroiderers or those working on high volume production where consistency is crucial. Incorporating a tension gauge into your toolkit allows for more precise adjustments and ensures consistent, high quality stitching results.
• Automatic Tension Settings
Some modern embroidery machines feature automatic tension settings that use sensors to detect and adjust thread tension automatically. While automatic tension can be convenient, understanding manual tension adjustments remains valuable. Manual adjustments allow you to fine tune tension settings for specific project requirements or troubleshoot issues that automatic systems may not fully address. By mastering both manual and automatic tension adjustments, you gain greater control over the embroidery process and can achieve superior stitching quality.
By employing these techniques and practices, embroiderers can develop a deeper understanding of tension settings and achieve consistent, high quality results in their embroidery projects. Each adjustment and test run contributes to refining your skills and mastering the art of tension control, ensuring that every stitch meets your artistic and technical standards.
Troubleshooting Common Issues
Troubleshooting common issues in embroidery is essential for achieving consistent, high quality results. Embroiderers often encounter various challenges that can affect stitch quality, design clarity, and overall project success. By understanding the root causes of these issues and employing effective troubleshooting techniques, embroiderers can overcome obstacles and enhance their embroidery skills.
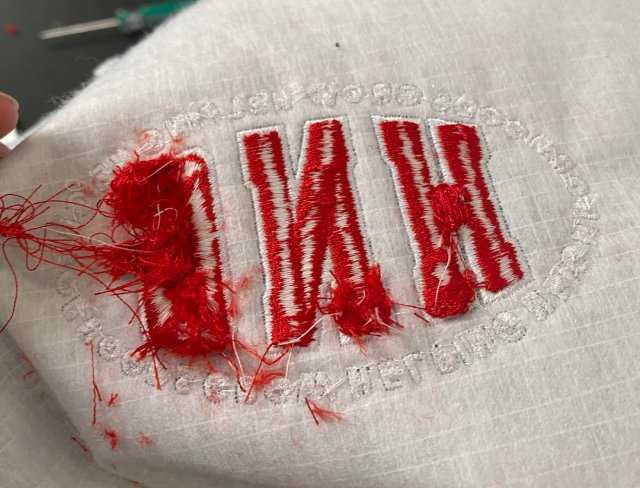
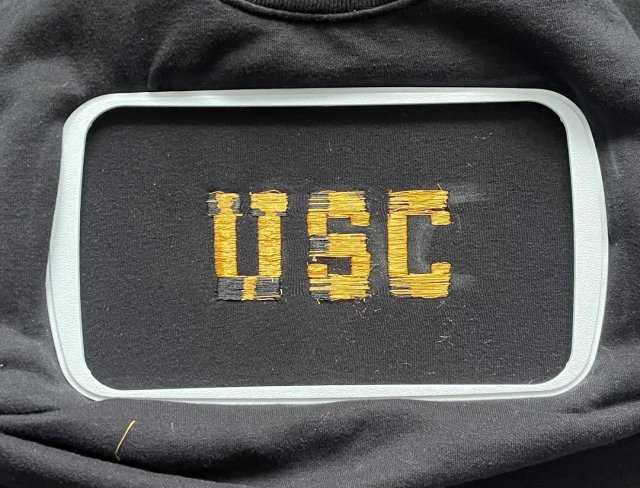
One of the most common issues in embroidery is thread breakage. Thread breakage can occur due to several factors, including incorrect tension settings, dull or bent needles, or using low quality thread. To troubleshoot thread breakage, start by checking the tension settings, ensure that both the upper and lower tensions are correctly adjusted for the type of thread and fabric being used. Inspect the needle for any signs of wear or damage and replace it if necessary. Using a high quality embroidery thread suitable for your project’s requirements can also minimize thread breakage.
Another prevalent issue is puckering or fabric distortion. Puckering often results from excessive tension or inadequate stabilizing of the fabric. To troubleshoot puckering, adjust the tension settings gradually, testing on scrap fabric of the same type used in your project. Ensure that the fabric is properly hooped and stabilized to prevent shifting during embroidery. Using the correct stabilizer for the fabric type can significantly reduce puckering and improve stitch quality.
Inconsistent stitch tension across the design is another challenge faced by embroiderers. This issue can arise from uneven hooping, improper bobbin tension, or machine malfunctions. To troubleshoot uneven tension, start by rehooping the fabric to ensure it is evenly stretched and stabilized. Check the bobbin tension using a drop test method, adjusting the tension screw as needed for balanced stitches. Regularly maintain your embroidery machine by cleaning the tension discs, bobbin case, and needle plate to prevent buildup that could affect tension consistency.
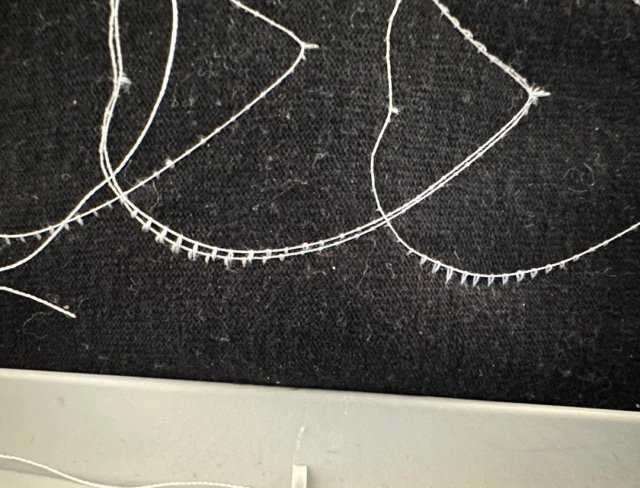
Additionally, skipped stitches or thread loops on the fabric surface can detract from the embroidery’s overall appearance. Skipped stitches may occur due to a dull or bent needle, incorrect needle size for the fabric, or insufficient stabilizer. To troubleshoot skipped stitches, first, replace the needle with a new, sharp needle suitable for the fabric type. Ensure that the needle size matches the thread thickness and fabric weight. Properly hooping and stabilizing the fabric, especially for intricate designs or dense stitching, can prevent skipped stitches and improve stitch formation.
Lastly, understanding and addressing these common issues requires patience, practice, and attention to detail. Keep a record of troubleshooting techniques that work well for specific types of fabrics, threads, and designs. Experiment with different settings, needles, and stabilizers to find the optimal combination for achieving professional quality embroidery. By mastering troubleshooting techniques, embroiderers can confidently tackle challenges, enhance their skills, and produce flawless embroidery that meets their artistic vision and technical standards.
Conclusion
Embroidery is as much an art form as it is a technical skill, requiring meticulous attention to detail and a deep understanding of various factors that influence stitch quality. Throughout this article, we’ve explored the critical aspects of tension settings in embroidery, from understanding the basics of upper and lower tension adjustments to mastering troubleshooting techniques for common issues. Achieving balanced tension settings is paramount to producing high quality embroidery, ensuring that stitches are precise, threads interlock seamlessly, and fabric remains smooth and undistorted.
By delving into the intricacies of tension adjustments, embroiderers can refine their craftsmanship and elevate the quality of their work. Whether adjusting tension for delicate fabrics or dense designs, the techniques discussed, such as conducting test runs, maintaining the machine, and seeking guidance from resources, provide invaluable tools for achieving consistent results. Understanding the impact of tension on embroidery quality empowers embroiderers to overcome challenges, troubleshoot effectively, and produce professional grade projects that exceed expectations.
As you continue your embroidery journey, remember that mastery of tension settings is an ongoing process of learning and experimentation. Each project offers an opportunity to refine your skills and discover new techniques for achieving optimal tension balance. Embrace the creative possibilities that embroidery affords, and leverage your understanding of tension settings to create intricate designs that captivate and inspire. With practice and persistence, you can harness the power of tension control to bring your artistic visions to life in every stitch.
Now that you have read through this article, feel free to SHOP for products we have created. If you are looking for something special which isn’t in our store, feel free to contact us.